Dagster with Python, Singer, and Meltano

I have been a fan of Dagster for data orchestration for a little while and wanted to share some of the basics. There are a lot of cool things I like about it (compared to airflow and other schedulers):
- It is Declarative (via their Software-Defined Asset object). I personally like tools and frameworks that allow me to declare a desired end state (Terraform, dbt, Puppet, Ansible, etc.) vs. frameworks that have me build a bunch of imperative tasks that get daisy chained together.
- It makes it very easy to define dependencies as function arguments. It reminds a lot of simplicity I see with ref() statements in dbt.
- It feels like it is a better fit for iterative engineering. It has easy support for writing unit tests and running the same code/functionality in different environments.
- It pretty easily has integration support with many data related steps I would want to apply as part of an asset building pipeline - including tools like dbt, airbye, meltano, etc.
Goal for this blog post:
In this post, I am going to document different ways how I can build pretty simple common pipelines that take a csv and upload the contents to postgres via Dagster using:
- Python Code
- Singer
- Meltano
Set Up Steps for this demo:
- We need to install Dasgter + necessary python packages (I am installing it locally, but we could install it in a docker also):
pip3 install dagster dagit pandas psycopg2 - We need to install postgres (also adding pgadmin for web based admin) in dockers:
https://towardsdatascience.com/how-to-run-postgresql-and-pgadmin-using-docker-3a6a8ae918b5
This creates us a local postgres instance with a database "demo_db". - We need to create a table in the demo_db database:
CREATE TABLE IF NOT EXISTS public.sales
(
    TransactionID text
    , Seller text
    , Date text
    , Value text
    , Title text
    , Identifier text
    , Condition text
    , RetailValue text
    , ItemValue text
);
- We need some sample data in csv format to upload, so I cerated some sales data for a 1973 Topps Rich Gossage baseball card (below contains a few records):
TransactionID,Seller,Date,Value,Title,Identifier,Condition,RetailValue,ItemValue
8094231,comicards990,2023-04-12,14.59,1973 Topps Rich "Goose" Gossage Rookie White Sox HOF #174,134520441986,Ungraded,6.00,8.73
8094232,916lukey31,2023-04-11,10.95,1973 Topps #174 Rich Gossage RC HOF Vg-Ex *Free Shipping*,275699466365,Ungraded,6.00,8.73
8094233,jayjay5119,2023-04-11,6.50,1973 Topps Baseball! Rich Gossage rookie card! Card174! Chicago White Sox!,195695255305,Ungraded,6.00,8.73
Running Dagster with Python
1) The first thing I did was to run the scaffolding command to create a new dagster project:
dagster project scaffold --name dagster-project
It created the following directory and files:
| File/Directory | Description |
|---|---|
| dagster_project/ | A Python package that contains your new Dagster code. |
| dagster_project_tests/ | A Python package that contains tests fordagster_project. |
| README.md | A description and starter guide for your new Dagster project. |
| pyproject.toml | A file that specifies package core metadata in a static, tool-agnostic way. This file includes a tool.dagster section which references the Python package with your Dagster definitions defined and discoverable at the top level. This allows you to use thedagster dev command to load your Dagster code without any parameters. Refer to the Code locations documentation to learn more.Note: pyproject.toml was introduced in PEP-518 and meant to replace setup.py, but we may still include a setup.py for compatibility with tools that do not use this spec. |
| setup.py | A build script with Python package dependencies for your new project as a package. |
| setup.cfg | An ini file that contains option defaults for setup.py commands. |
2) In that directory we save our sales csv file as:
1973_topps_gossage_sales.csv
3) In that directory, create a file called python_assets.py:
1
2
3
4
5
6
7
8
9
10
11
12
13
14
15
16
17
18
19
20
21
22
23
24
25
26
27
28
29
30
31
32
33
34
35
36
37
38
39
40
41
42
43
44
from dagster import asset # import the `dagster` library

# python libraries we need for these assets
import numpy as np
import psycopg2
import psycopg2.extras as extras
import pandas as pd

# get sales from a csv file

@asset
def get_sales():
    csv_file_path = './1973_topps_gossage_sales.csv'
    df = pd.read_csv(csv_file_path)
    return df

# write sales to postgres table, calling the dataframe from get_sales
@asset
def write_sales(get_sales):
    conn = psycopg2.connect(
        database="demo_db",
        user='root',
        password='root',
        host='localhost',
        port='5432',
        options="-c search_path=dbo,public"
    )

    table = 'sales'
    tuples = [tuple(x) for x in get_sales.to_numpy()]

    cols = ','.join(list(get_sales.columns))
    query = "INSERT INTO %s(%s) VALUES %%s" % (table, cols)
    cursor = conn.cursor()
    try:
        extras.execute_values(cursor, query, tuples)
        conn.commit()
    except (Exception, psycopg2.DatabaseError) as error:
        print("Error: %s" % error)
        conn.rollback()
        cursor.close()
        return 1
    print("the dataframe is inserted")
    cursor.close()
In the above code, we have functions preceded by the @asset decorator. This tells Dagster to identify them as software-defined assets that can be materialized.
The get_sales asset will read the csv file and populate the dataframe. The write_sales asset writes the contents of dataframe to our Postgres table. Notice the write_sales(get_sales) signature, that is how Dagster can recognize that get_sales is a dependency for write_sales.
PLEASE NOTE: We would never want to hard code database credentials in our python code, below is how you can use environment variables to make it more secure:
https://docs.dagster.io/guides/dagster/using-environment-variables-and-secrets
4) We can now run the asset pipeline in the Dagster dashboard. You can type the following on the command line to launch the dagit dashboard:
dagster dev -f python_assets.py
The you can visit the following address in your browser to view the dashboard:
http://127.0.0.1:3000/assets

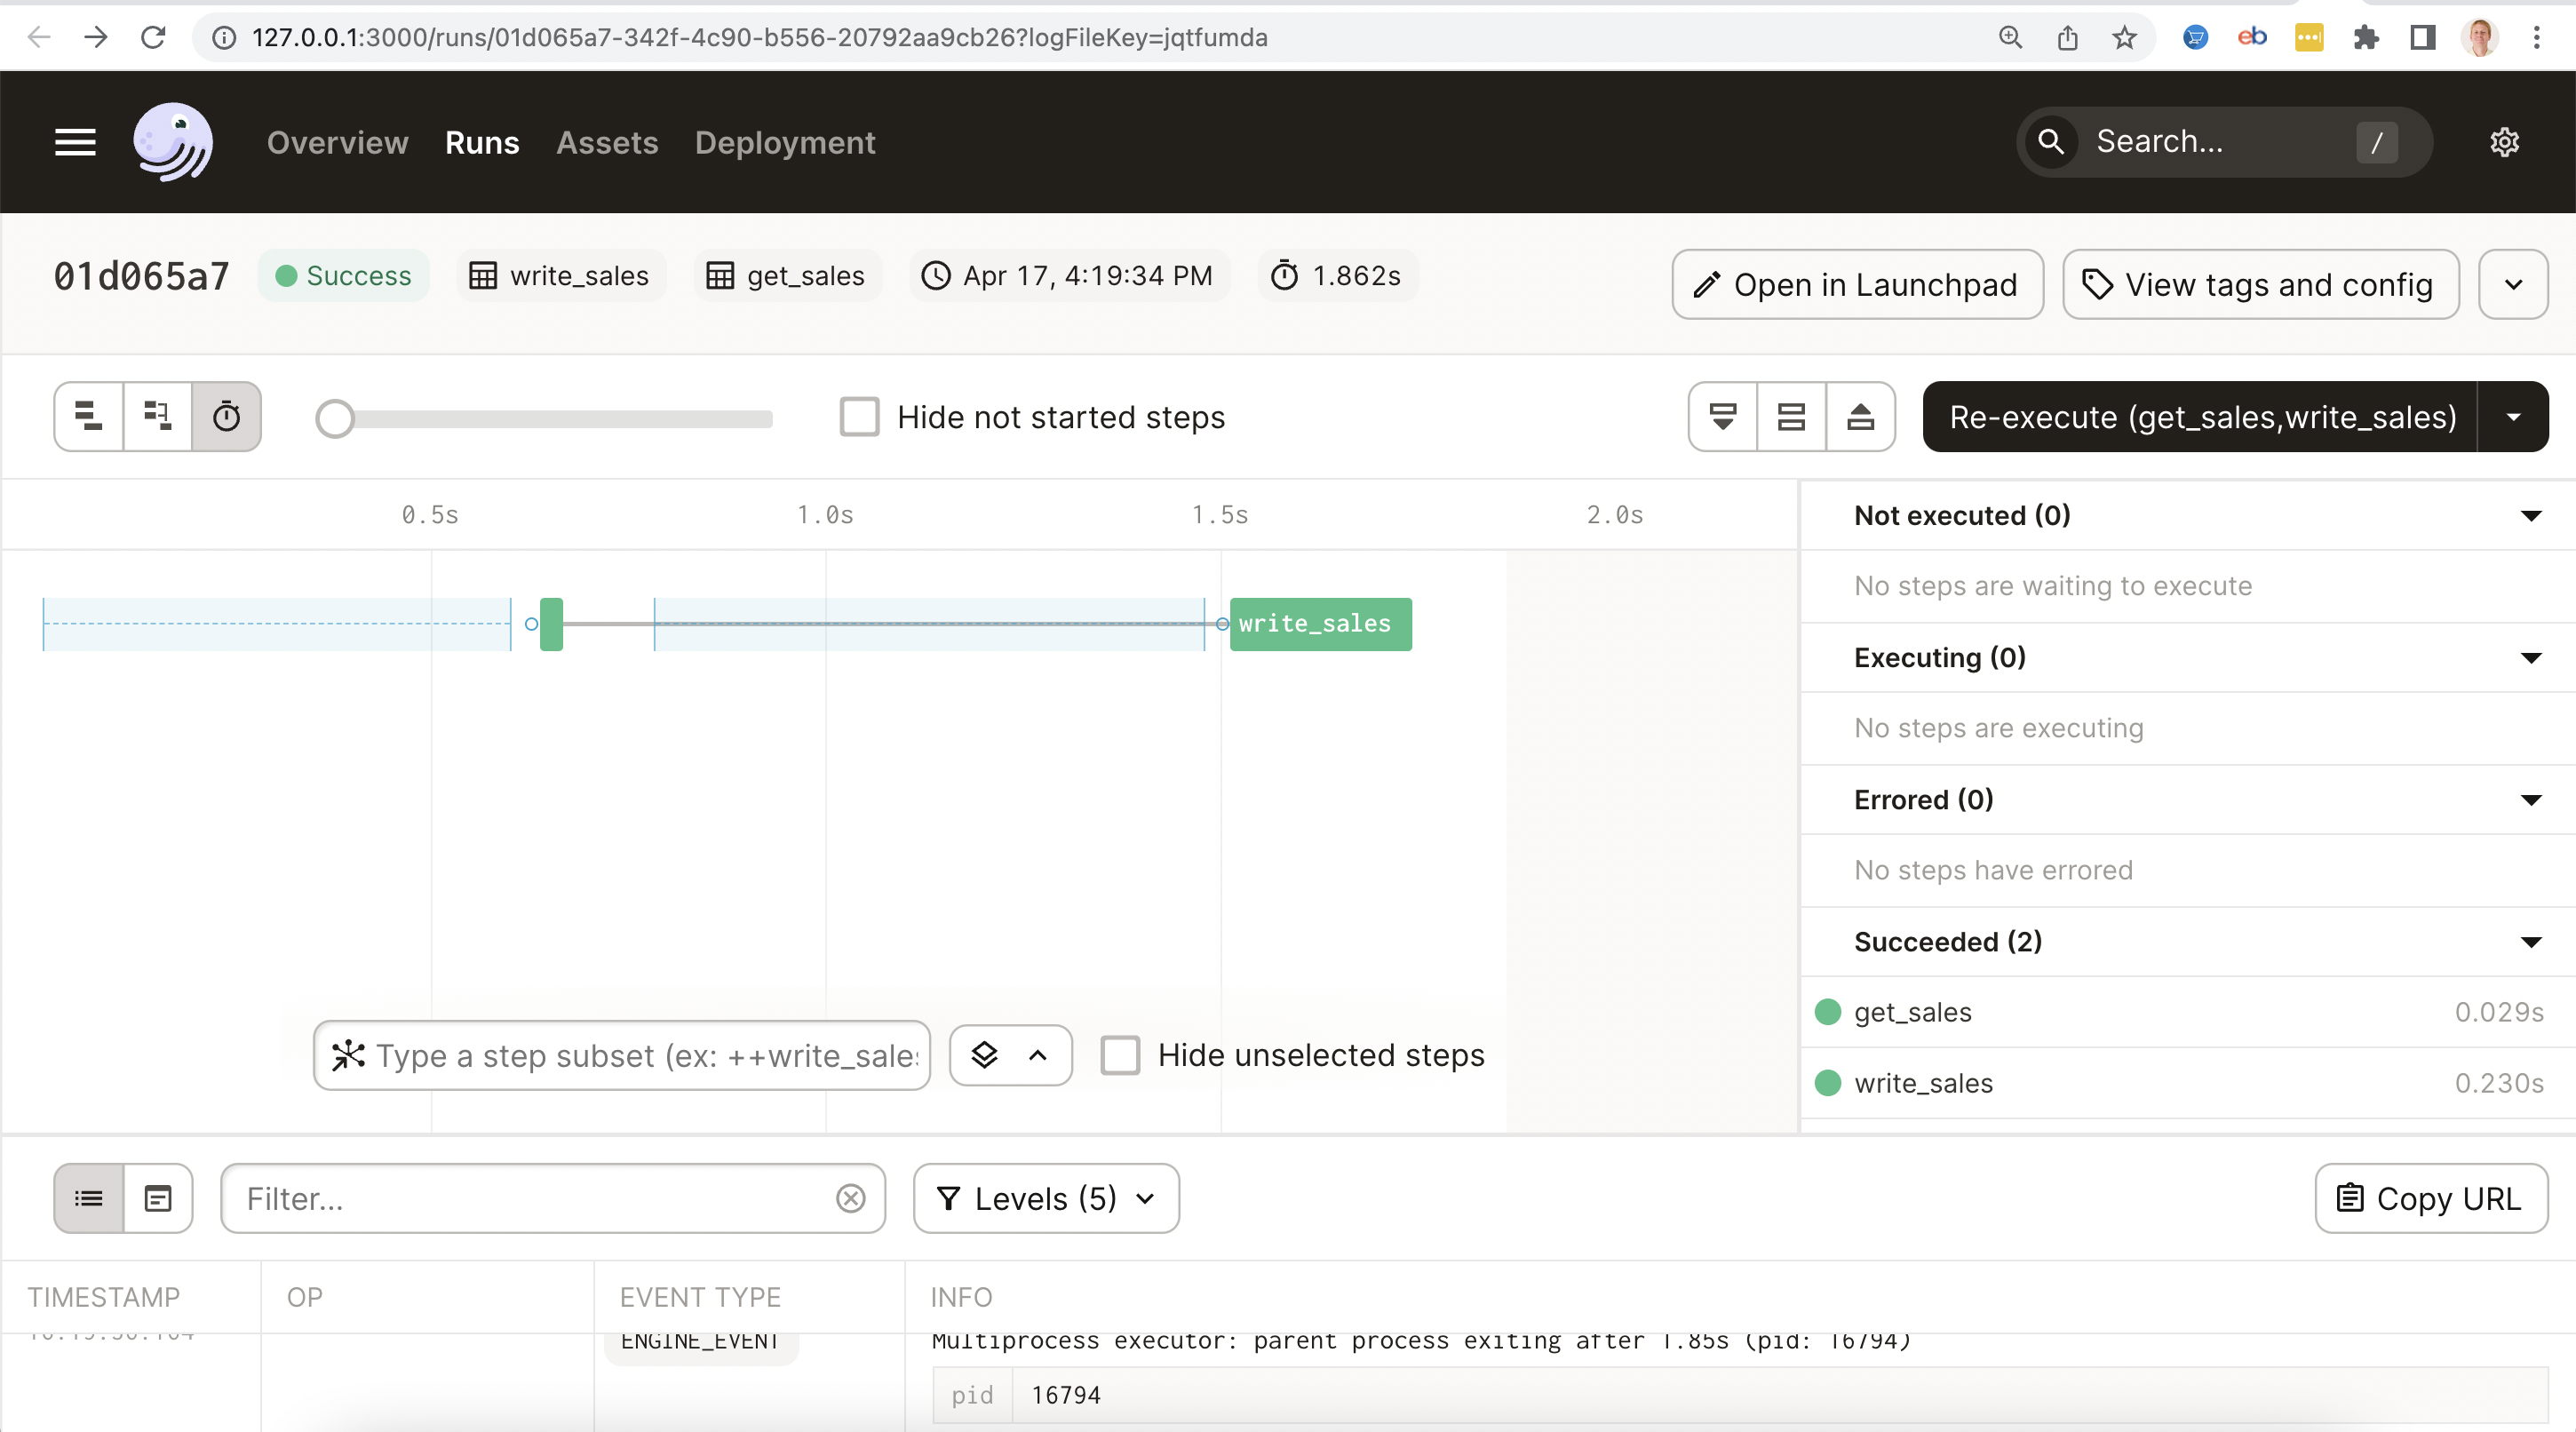
4) Select the checkboxes in front of both assets and click the "Materialize selected" button. This will execute the assets in the correct order.
The screen below show the successful materialization of the assets:

5) We can log into Postgres (via pgadmin) and see our records written into the public.sales table:

Running Dagster with Singer
Singer is an open-source ETL tool from Stitch that lets you write scripts to move data from your sources to their destinations. Singer has two types of scripts—taps and targets.
- A tap is a script, or a piece of code, that connects to your data sources and outputs the data in JSON format.
- A target script pipes these data streams from input sources and store them in your data destinations.
1) In order to migrate our dagster flow to use singer, we will need a tap to read our csv and a target to write to postgres. We can install them into python virtual environments with the below commands:
1
2
3
4
5
6
7
8
9
10
11
python -m venv tap-csv-venv
source tap-csv-venv/bin/activate
pip3 install git+https://github.com/MeltanoLabs/tap-csv.git
alias tap-csv="tap-csv-venv/bin/tap-csv"
deactivate

python -m venv target-postgres-venv
source target-postgres-venv/bin/activate
pip3 install git+https://github.com/datamill-co/target-postgres.git
alias target-postgres="target-postgres-venv/bin/target-postgres"
deactivate
2) Configure the tap-csv (docs at https://github.com/MeltanoLabs/tap-csv):
- Create a file singer/config.json with this content:
1
2
3
{
    "csv_files_definition": "./singer/files_def.json"
}
- Create a file singer/files_def.json with this content:
1
2
3
4
5
6
[
    {   "entity" : "sales",
        "path" : "1973_topps_gossage_sales.csv",
        "keys" : ["TransactionID"]
    }
]
You can test that the tap will read in your file and convert it to json:
tap-csv --config singer/config.json
2023-04-03 05:23:13,706 | INFO | tap-csv | Beginning full_table sync of 'sales'...
2023-04-03 05:23:13,706 | INFO | tap-csv | Tap has custom mapper. Using 1 provided map(s).
{"type": "SCHEMA", "stream": "sales", "schema": {"properties": {"TransactionID": {"type": ["string", "null"]}, "Seller": {"type": ["string", "null"]}, "Date": {"type": ["string", "null"]}, "Value": {"type": ["string", "null"]}, "Title": {"type": ["string", "null"]}, "Identifier": {"type": ["string", "null"]}, "Condition": {"type": ["string", "null"]}, "RetailValue": {"type": ["string", "null"]}, "ItemValue": {"type": ["string", "null"]}}, "type": "object"}, "key_properties": ["TransactionID"]}
{"type": "RECORD", "stream": "sales", "record": {"TransactionID": "8094231", "Seller": "comicards990", "Date": "2023-04-12", "Value": "14.59", "Title": "1973 Topps Rich \"Goose\" Gossage Rookie White Sox HOF #174", "Identifier": "134520441986", "Condition": "Ungraded", "RetailValue": "6.00", "ItemValue": "8.73"}, "time_extracted": "2023-04-03T09:23:13.706647+00:00"}
{"type": "STATE", "value": {"bookmarks": {"sales": {"starting_replication_value": null}}}}
{"type": "RECORD", "stream": "sales", "record": {"TransactionID": "8094232", "Seller": "916lukey31", "Date": "2023-04-11", "Value": "10.95", "Title": "1973 Topps #174 Rich Gossage RC HOF Vg-Ex *Free Shipping*", "Identifier": "275699466365", "Condition": "Ungraded", "RetailValue": "6.00", "ItemValue": "8.73"}, "time_extracted": "2023-04-03T09:23:13.706848+00:00"}
{"type": "RECORD", "stream": "sales", "record": {"TransactionID": "8094233", "Seller": "jayjay5119", "Date": "2023-04-11", "Value": "6.50", "Title": "1973 Topps Baseball! Rich Gossage rookie card! Card174! Chicago White Sox!", "Identifier": "195695255305", "Condition": "Ungraded", "RetailValue": "6.00", "ItemValue": "8.73"}, "time_extracted": "2023-04-03T09:23:13.707571+00:00"}
2023-04-03 05:23:13,707 | INFO | singer_sdk.metrics | INFO METRIC: {"metric_type": "timer", "metric": "sync_duration", "value": 0.0012621879577636719, "tags": {"stream": "sales", "context": {}, "status": "succeeded"}}
2023-04-03 05:23:13,708 | INFO | singer_sdk.metrics | INFO METRIC: {"metric_type": "counter", "metric": "record_count", "value": 3, "tags": {"stream": "sales", "context": {}}}
{"type": "STATE", "value": {"bookmarks": {"sales": {}}}}
{"type": "STATE", "value": {"bookmarks": {"sales": {}}}}
2) Configure the taraget-postgres (docs at https://github.com/datamill-co/target-postgres):
- Create a file singer/target_postgres_config.json with this content:
1
2
3
4
5
6
7
8
{
    "postgres_host": "localhost",
    "postgres_port": 5432,
    "postgres_database": "demo_db",
    "postgres_username": "root",
    "postgres_password": "root",
    "postgres_schema": "public"
}
You can test that the tap and target will read in your file and upload it to postgres:
tap-csv --config singer/config.json | target-postgres --config singer/target_postgres_config.json
INFO PostgresTarget created with established connection: `user=root password=xxx dbname=demo_db host=localhost port=5432 application_name=target-postgres`, PostgreSQL schema: `public`
INFO Sending version information to singer.io. To disable sending anonymous usage data, set the config parameter "disable_collection" to true
2023-04-03 13:09:44,466 | INFO | tap-csv | Beginning full_table sync of 'sales'...
2023-04-03 13:09:44,467 | INFO | tap-csv | Tap has custom mapper. Using 1 provided map(s).
2023-04-03 13:09:44,467 | INFO | singer_sdk.metrics | INFO METRIC: {"metric_type": "timer", "metric": "sync_duration", "value": 0.000537872314453125, "tags": {"stream": "sales", "context": {}, "status": "succeeded"}}
2023-04-03 13:09:44,467 | INFO | singer_sdk.metrics | INFO METRIC: {"metric_type": "counter", "metric": "record_count", "value": 3, "tags": {"stream": "sales", "context": {}}}
INFO Mapping: test to None
INFO Mapping: sales to ['sales']
INFO Mapping: tp_sales_transactionid__sdc_sequence_idx to None
INFO Stream sales (sales) with max_version None targetting None
INFO Root table name sales
INFO Writing batch with 3 records for `sales` with `key_properties`: `['TransactionID']`
INFO Writing table batch schema for `('sales',)`...
INFO METRIC: {"type": "timer", "metric": "job_duration", "value": 0.048573970794677734, "tags": {"job_type": "upsert_table_schema", "path": ["sales"], "database": "demo_db", "schema": "public", "table": "sales", "status": "succeeded"}}
INFO Writing table batch with 3 rows for `('sales',)`...
INFO METRIC: {"type": "counter", "metric": "record_count", "value": 3, "tags": {"count_type": "table_rows_persisted", "path": ["sales"], "database": "demo_db", "schema": "public", "table": "sales"}}
INFO METRIC: {"type": "timer", "metric": "job_duration", "value": 0.10874700546264648, "tags": {"job_type": "table", "path": ["sales"], "database": "demo_db", "schema": "public", "table": "sales", "status": "succeeded"}}
INFO METRIC: {"type": "counter", "metric": "record_count", "value": 3, "tags": {"count_type": "batch_rows_persisted", "path": ["sales"], "database": "demo_db", "schema": "public"}}
INFO METRIC: {"type": "timer", "metric": "job_duration", "value": 0.10944700241088867, "tags": {"job_type": "batch", "path": ["sales"], "database": "demo_db", "schema": "public", "status": "succeeded"}}
Some things to take note of:
- We defined the entity = "sales" in the tap. So that dictates the table_name for the target.
- We see in the output "job_type": "upsert_table_schema", this means that write to postgres will do an upsert of the record based on the keys we defined in tap ("keys" : ["TransactionID"]).
3) In that directory, create a file called python_assets.py:
1
2
3
4
5
6
7
8
9
10
11
12
# import the `dagster` library
from dagster import asset

# python libraries we need for these assets
import subprocess

# get sales from a csv file and write to postgres via singer tap and target
@asset
def get_and_write_sales_with_singer():
    ps = subprocess.Popen(['~/dagster/dagster-project/tap-csv-venv/bin/tap-csv', '--config', 'singer/config.json'],
    stdout=subprocess.PIPE) output = subprocess.run(['~/dagster/dagster-project/target-postgres-venv/bin/target-postgres', '--config', 'singer/target_postgres_config.json'], stdin=ps.stdout)
    ps.wait() print(output.stdout)
4) We can now run the asset pipeline in the Dagster dashboard. You can type the following on the command line to launch the dagit dashboard:
1
dagster dev -f singer_assets.py
The you can visit the following address in your browser to view the dashboard:
http://127.0.0.1:3000/assets

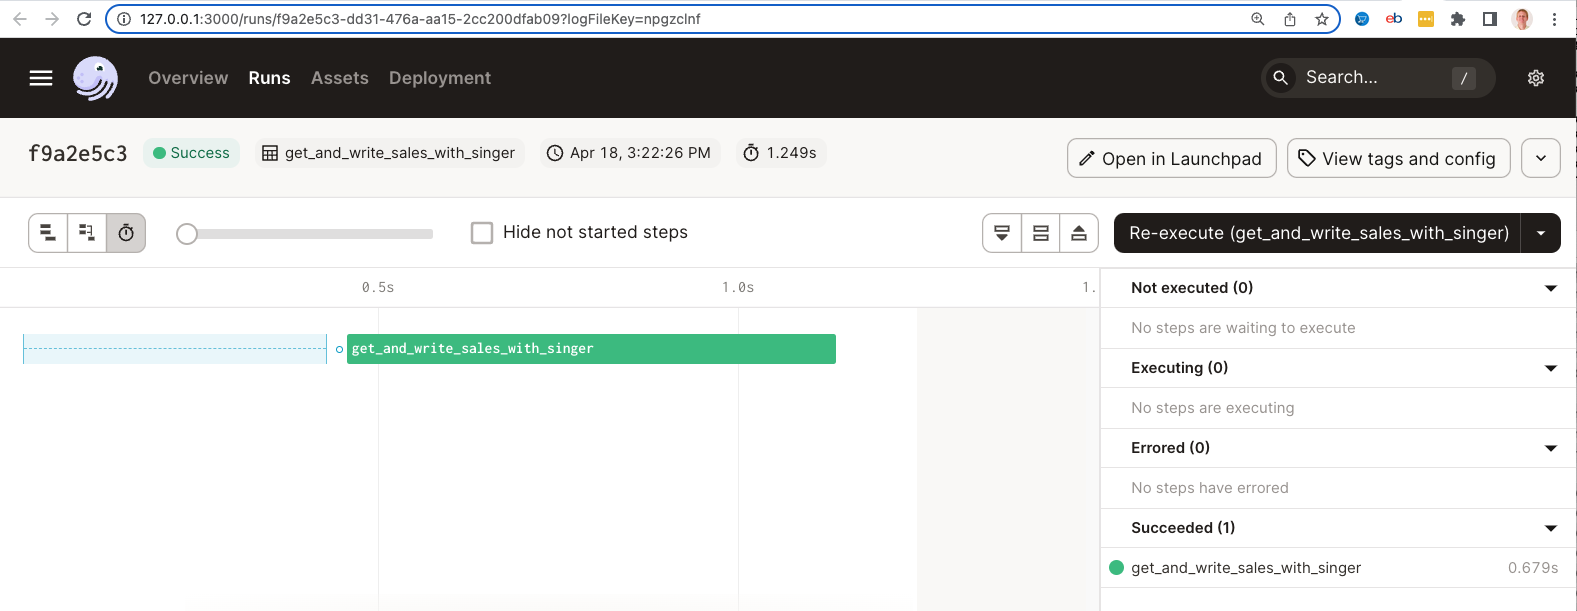
5) Select the checkboxes in front of both assets and click the "Materialize selected" button. This will execute the assets in the correct order.
The screen below show the successful materialization of the assets:

6) We can log into Postgres (via pgadmin) and see our records written into the public.sales table:

Running Dagster with Meltano
Meltano is an open source tool which can be used to extract from data sources and load it to destinations like your data warehouse. It uses extractors and loaders written in the Singer open source standard.
1) In order to migrate our dagster flow to use meltano, we will need to install meltano:
1
pip3 install meltano
2) Configure a new meltano project and switch into the directory:
1
2
meltano init meltano
cd meltano
3) We need to install the tap and target:
1
2
meltano add extractor tap-csv
meltano add loader target-postgres --variant datamill-co
4) Adding a job that include the tap and target:
1
meltano job add demo_job --tasks "tap-csv target-postgres"
4) Configure the following in meltano.yml (it should look very similar to the singer configuration from the Singer section):
1
2
3
4
5
6
7
8
9
10
11
12
13
14
15
16
17
18
19
20
21
22
23
24
25
26
27
28
29
30
31
32
33
version: 1
default_environment: dev
project_id: fb9afb3c-5560-406e-b977-d86eef949779
environments:
- name: dev
- name: staging
- name: prod
plugins:
extractors:
- name: tap-csv
    variant: meltanolabs
    pip_url: git+https://github.com/MeltanoLabs/tap-csv.git
    config:
    files:
        - entity: sales
        file: ../1973_topps_gossage_sales.csv
        keys:
            - TransactionID
loaders:
- name: target-postgres
    variant: datamill-co
    pip_url: git+https://github.com/datamill-co/target-postgres.git
    config:
    host: localhost
    port: 5432
    user: root
    password: root
    dbname: demo_db
    default_target_schema: public
jobs:
- name: demo_job
tasks:
- tap-csv target-postgres
5) Run meltano on the command line:
1
meltano run demo_job
2023-04-03T18:06:17.336263Z [info ] Environment 'dev' is active
2023-04-03T18:06:19.212684Z [info ] INFO Starting sync cmd_type=elb consumer=False name=tap-csv producer=True stdio=stderr string_id=tap-csv
2023-04-03T18:06:19.212939Z [info ] INFO Syncing entity 'sales' from file: '../1973_topps_gossage_sales.csv' cmd_type=elb consumer=False name=tap-csv producer=True stdio=stderr string_id=tap-csv
2023-04-03T18:06:19.213097Z [info ] INFO Sync completed cmd_type=elb consumer=False name=tap-csv producer=True stdio=stderr string_id=tap-csv
2023-04-03T18:06:19.577999Z [info ] time=2023-04-03 14:06:19 name=target_postgres level=INFO message=Table '"sales"' exists cmd_type=elb consumer=True name=target-postgres producer=False stdio=stderr string_id=target-postgres
2023-04-03T18:06:19.711365Z [info ] time=2023-04-03 14:06:19 name=target_postgres level=INFO message=Loading 3 rows into 'public."sales"' cmd_type=elb consumer=True name=target-postgres producer=False stdio=stderr string_id=target-postgres
2023-04-03T18:06:19.840375Z [info ] time=2023-04-03 14:06:19 name=target_postgres level=INFO message=Loading into public."sales": {"inserts": 0, "updates": 3, "size_bytes": 452} cmd_type=elb consumer=True name=target-postgres producer=False stdio=stderr string_id=target-postgres
2023-04-03T18:06:19.862895Z [info ] Incremental state has been updated at 2023-04-03 18:06:19.862840.
2023-04-03T18:06:19.871775Z [info ] Block run completed. block_type=ExtractLoadBlocks err=None set_number=0 success=True
6) Install the Dagster-Meltano library
1
2
cd ../
pip3 install dagster-meltano
7) In that directory, create a file called meltano_assets.py:
1
2
3
4
5
6
7
8
9
10
11
from dagster import Definitions, job
from dagster_meltano import meltano_resource, meltano_run_op

@job(resource_defs={"meltano": meltano_resource})
def run_job():
tap_done = meltano_run_op("demo_job")()

# alternatively we could run this
# tap_done = meltano_run_op("tap-csv target-postgres")()

defs = Definitions(jobs=[run_job])
8) We can now run the asset pipeline in the Dagster dashboard. You can type the following on the command line to launch the dagit dashboard:
1
dagster dev -f meltano_assets.py
